
Docs
Connect a Bot to Lark / Feishu
Set up an application bot, bind its identity and route authorized group messages.
Install the plugin first using the illustrated installation guide, then return here after a local Bot DM works.
Connect a PersonaBot to a work group: connect the application bot, bind its identity and authorize a group, then choose whether incoming messages belong in the Bot Inbox or a local Channel.
This guide starts with Lark international, an application bot, a test group and mentions-only intake. Feishu uses the same sequence, with a Feishu application and the Feishu platform selected.
Understand the three settings
| Setting | Location | Purpose |
|---|---|---|
| IM application connection | Settings → IM Bots → Feishu | Connect this Host to a Lark / Feishu application bot |
| External identity | PersonaBot detailed Profile | Choose who this Bot speaks as externally |
| Channel connector | Channel detailed Profile | Choose which external group and messages enter this Channel |
Binding an identity still requires explicit group authorization. It does not receive every group automatically, and a connector does not lend that identity to other Bots.
This guide combines actual setup controls with a Profile that completed real Lark connection. Configured captures come from the #823 qualified product (0.0.0-test.823.6 / Provider 4.32.0-botharness.2), using the dedicated “BotHarness IM QA #78” group. Empty forms show where to enter values; they are not proof of connection. No App Secret appears in the media. Use the browser image menu to view the original size.
1. Prepare your environment
You need:
- Membership in a Lark / Feishu organization and permission to create and publish a company-built application, or an administrator who can help.
- A test group and a Human account that can send messages in it.
- A running BotHarness, a working model and a PersonaBot. Confirm the Bot can answer a local DM first.
- A BotHarness product containing the qualified IM Provider. The product installs Core, Client and Provider together; do not separately install a Lark SDK, Human lark-cli or an arbitrary dsh-im version.
The public npm product has not been published. The reproducible path currently builds local product packages; these test versions are not npm installation commands. If you already have the #823 qualified artifacts, start the same Profile and continue to the next section.
Current source preview: build the qualified single-install product
Use Node ≥22 and pnpm 12.4.2. Pin the qualified revision in a new checkout rather than switching a running checkout:
git clone https://github.com/BotHarness/BotHarness.git botharness-lark
cd botharness-lark
git checkout c2a1f7cba13d1ba82e1b9e9b3b923babe428c0e7
git clone https://github.com/DoodleBears/dsh-im.git /tmp/bh-lark-provider
git -C /tmp/bh-lark-provider checkout 48e7a35792af5222cd40cfe1ba2607ac55a59df2
npm ci --prefix /tmp/bh-lark-provider --ignore-scripts --no-audit --no-fund
pnpm install --frozen-lockfile
pnpm build
node scripts/product-artifacts.mjs \
  --provider-source /tmp/bh-lark-provider \
  --output /tmp/bh-lark-product \
  --version 0.0.0-test.lark-guide
node scripts/dev-instance.mjs \
  --home "$HOME/.local/share/botharness-lark" \
  --port 32620 --product-artifacts /tmp/bh-lark-product
Open the launcher's private login URL locally; never include it in screenshots or video. Reuse the same --home to retain accounts, authorization and message records. Only one Host should receive events for an application. See the product installation notes for packaging details.
Video: connect, authorize and verify a message
This is a step-by-step edit of actual UI screenshots, not an uninterrupted recording or simulated connection success. Pause, seek or enable English/Chinese captions. The video downloads only when requested.
Download video · English captions · 中文字幕
Chapters: 0:00 App credentials and permissions → 0:32 Local connection → 0:48 Events and publishing → 1:12 Delivery target → 1:20 Identity and group authorization → 1:36 Message source. The executable steps remain below.
2. Prepare an application bot
For Lark, open the Lark developer console; for Feishu, open the Feishu developer console. The account, organization and application must belong to the same platform.
- Create a company-built application with a recognizable name, such as “Team assistant.” A custom group Webhook bot is a notification mechanism, not the two-way application bot used here.
- Add the Bot capability and find the App ID and App Secret under the application's credentials.
- Configure message permissions for the application identity. Human QR-login permissions cannot replace them.
- Use a long connection for events and subscribe to
im.message.receive_v1. If the console requires an active connection first, complete the next section, then return to save the subscription. - Publish an application version, complete any administrator approval and availability configuration, and add the application bot to the test group.
Enable permissions by purpose:
im:message.group_at_msg:readonly: receive group messages mentioning the bot; needed for the initial intake test.im:message:send_as_bot: send and reply as the application bot; needed for the initial reply test.im:message:readonly: read messages and message resources; needed for original-message and attachment reading.im:message.group_msg: obtain all group messages; needed for ordinary-message intake, group history and topic following. Request this sensitive permission when needed.im:resource: upload images and files; needed when sending attachments.
Your organization determines availability and approval requirements. Even with all-group-message permission, BotHarness only processes explicitly authorized groups and configured intake conditions. See the official message receive event and message history API.
Compare the actual console configuration
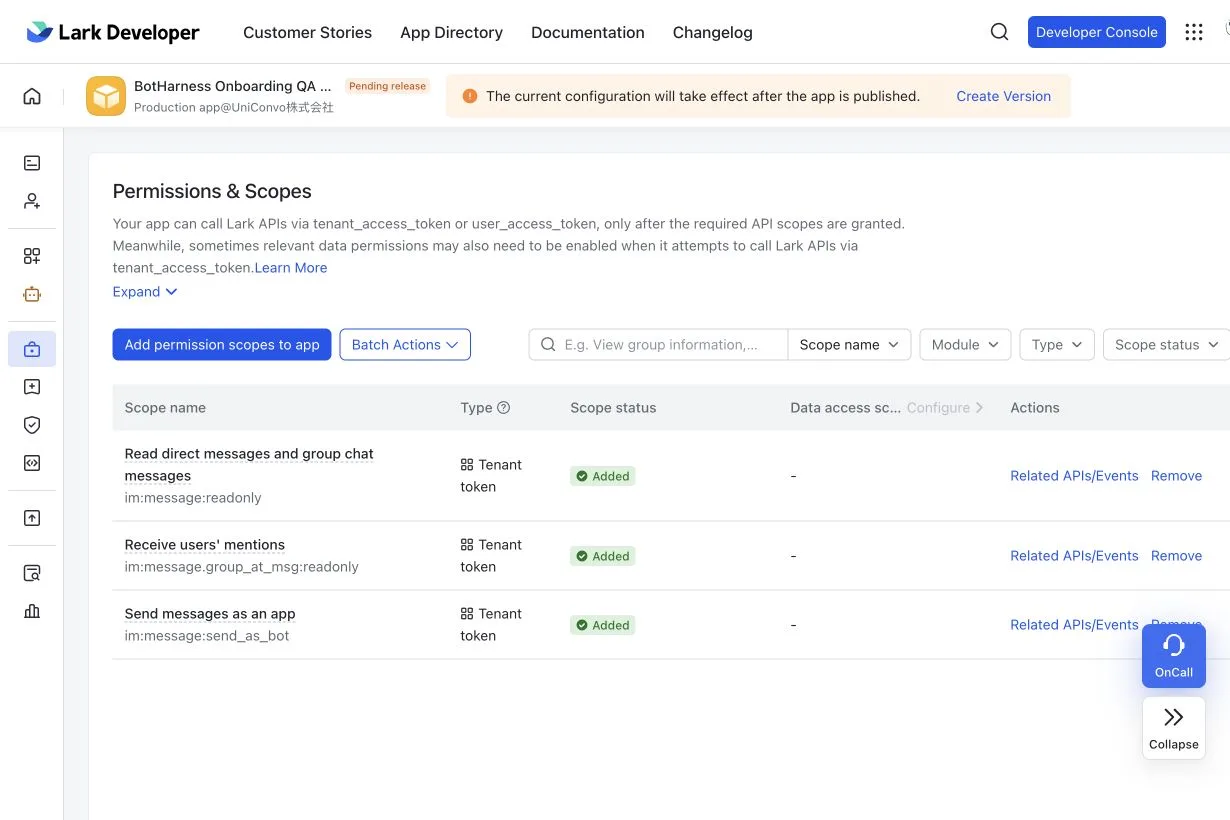
This fresh application was created through the Lark console for the #824 onboarding test. All three scopes use Tenant token, with status Added. The top banner still says Pending release: adding scopes alone does not make them effective. Establish the local connection, save the message event subscription and publish the version before testing group intake. All-group-message access is not enabled in this example.
The following older captures are read-only references from an already published test application. A new app still needs its own capability, scope requests, publication and administrator approval. Do not copy all of this test application's scopes or events.
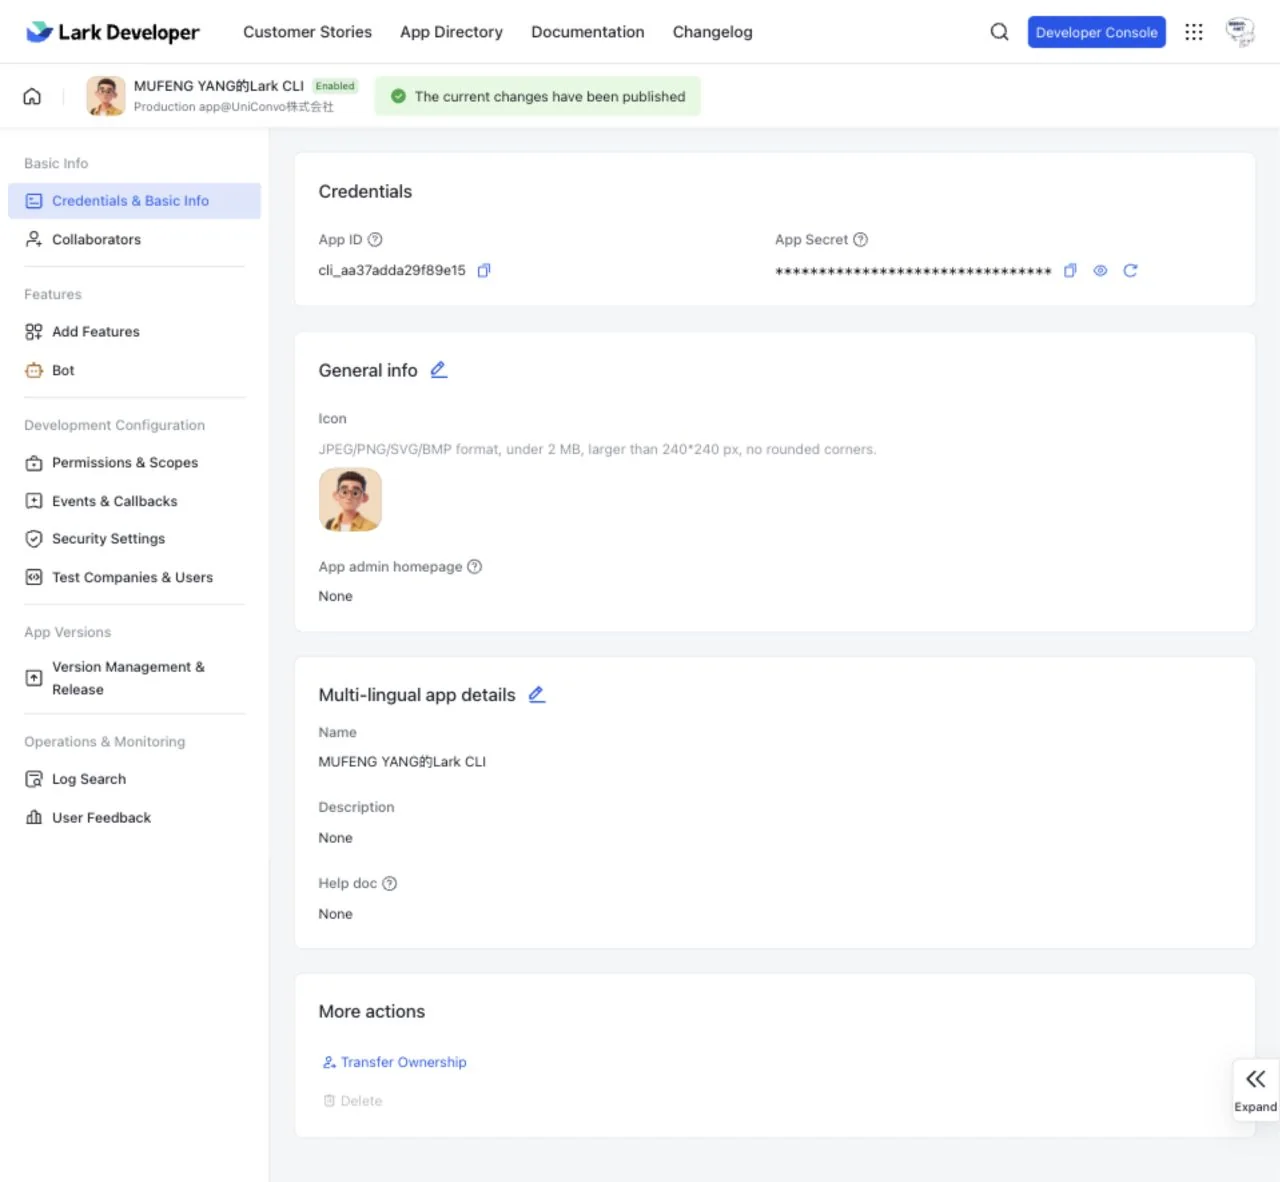
Open Credentials & Basic Info. Copy the secret privately into local settings; keep it hidden in screenshots.
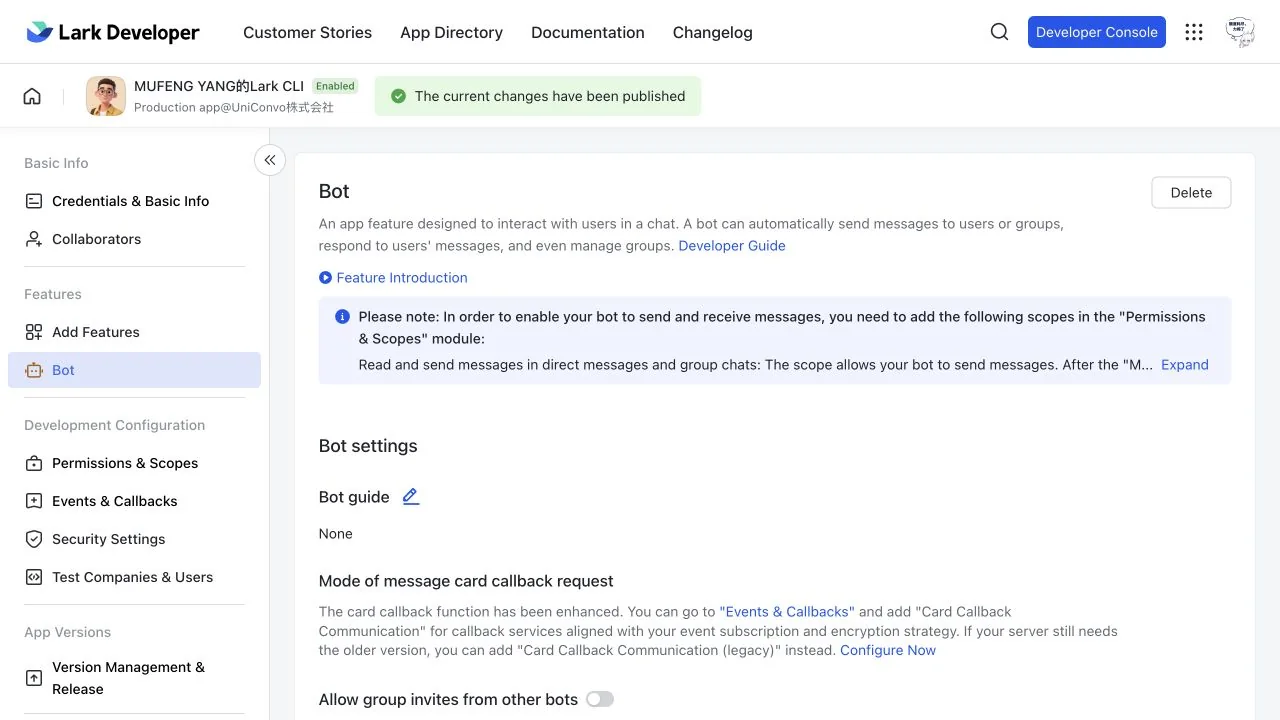
Add Bot under Add Features; the Bot settings entry appears in the sidebar afterwards.
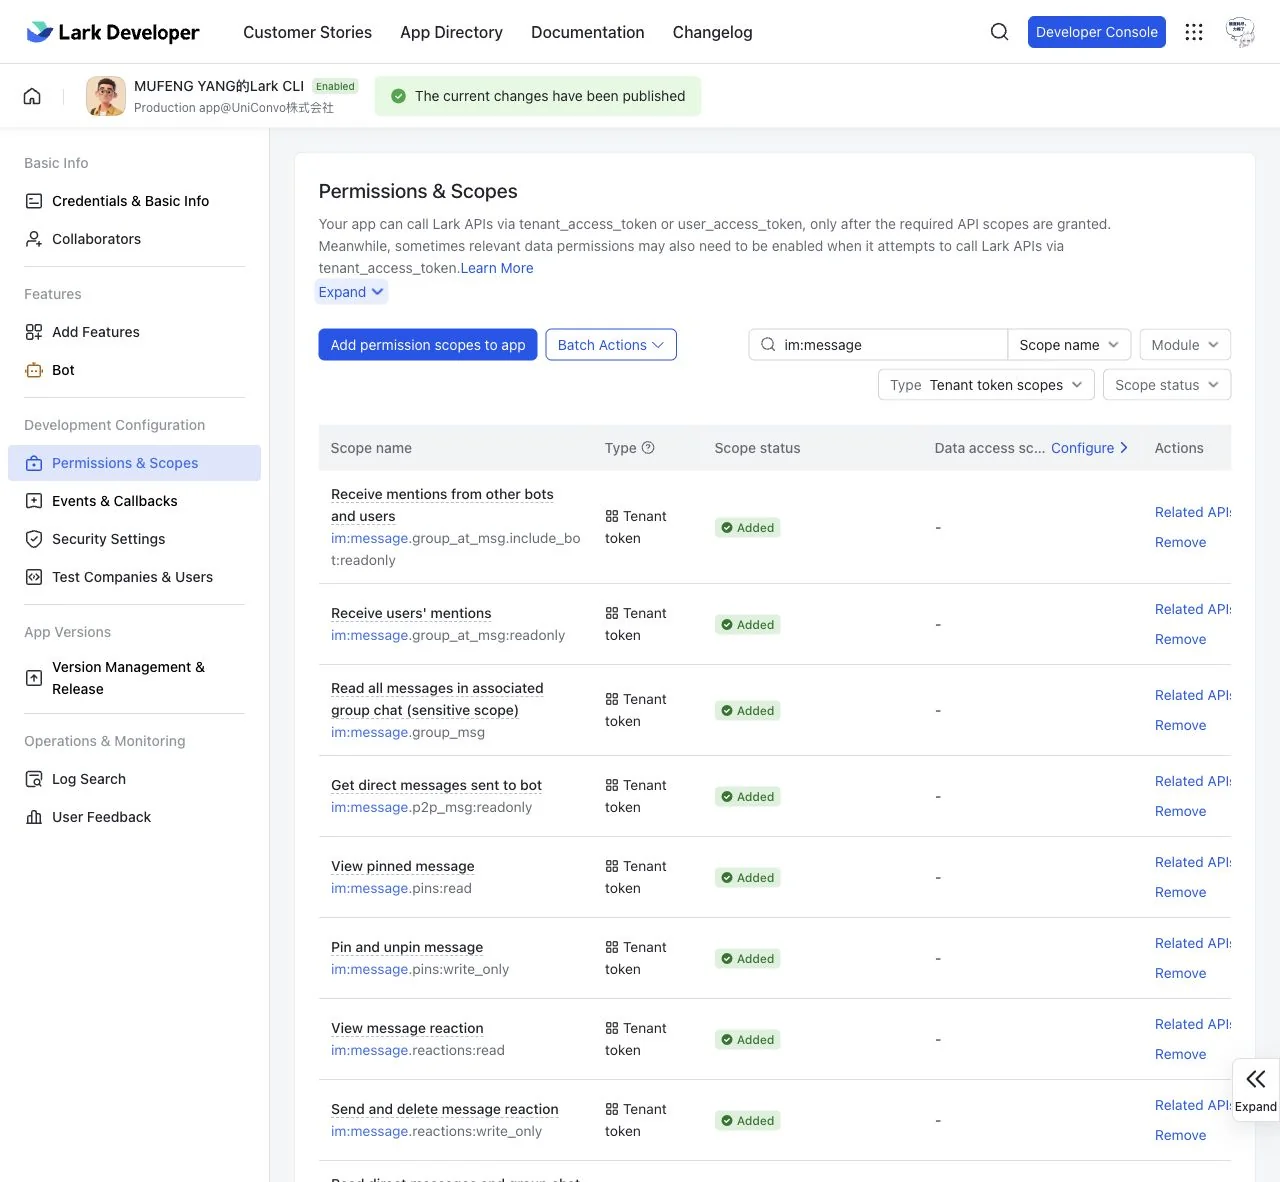
In Permissions & Scopes, search a scope name and select Tenant token scopes under Type. im:message.group_msg is sensitive; request it for ordinary intake, group history or topic following when needed. Pin and reaction scopes shown here are not requirements of this guide.
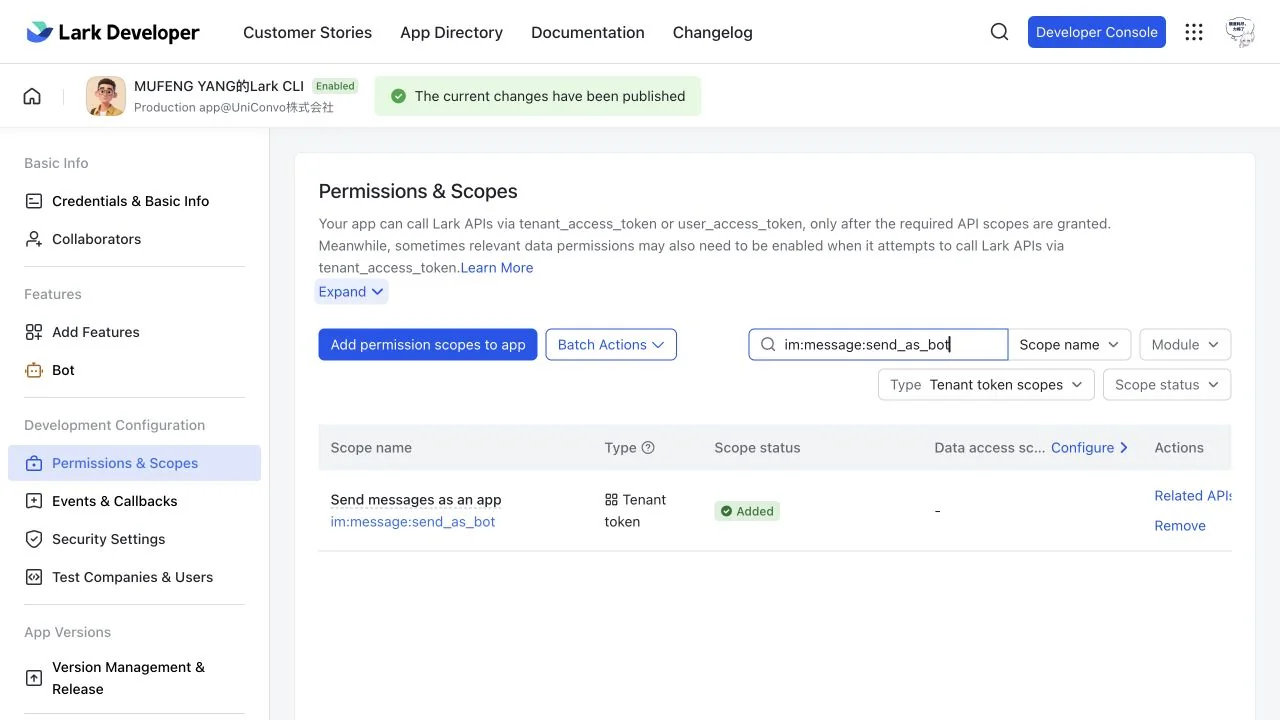
Search im:message:send_as_bot; check Tenant token and Added, then publish the change for it to take effect.
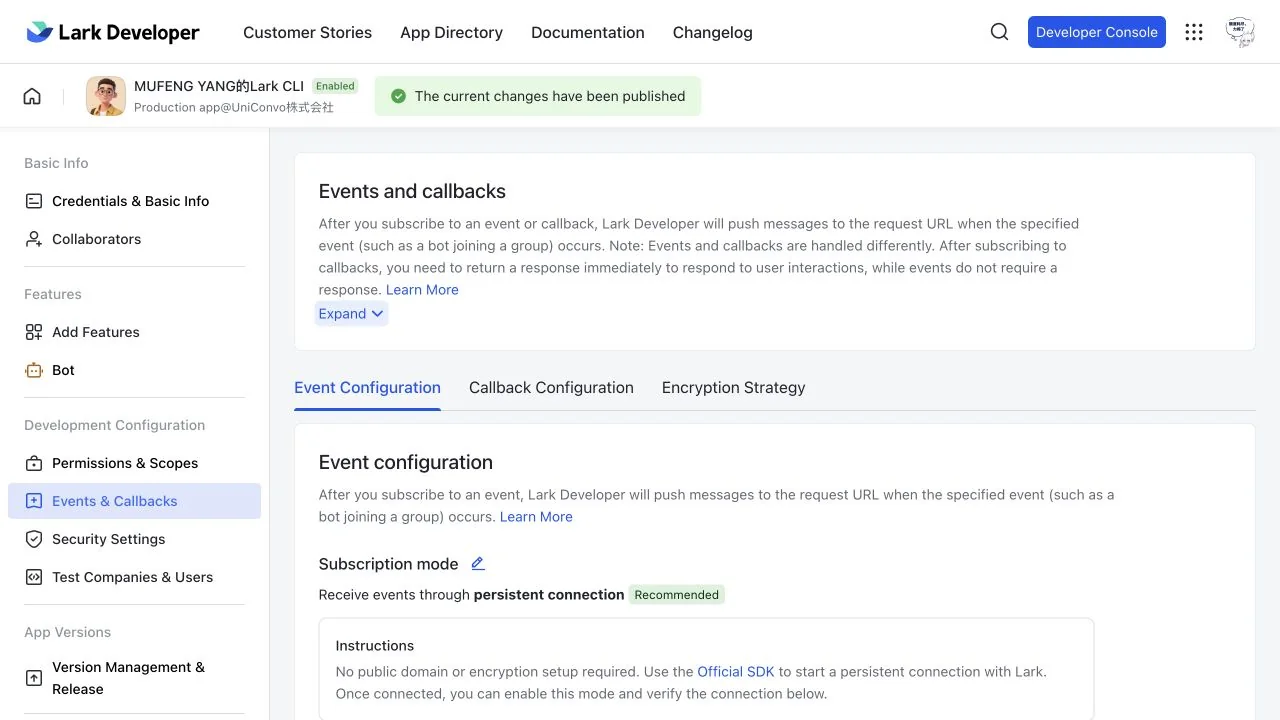
Open Events & Callbacks → Event Configuration and choose persistent connection for Subscription mode. The product's Provider owns this connection; a separate SDK receiver process is unnecessary.
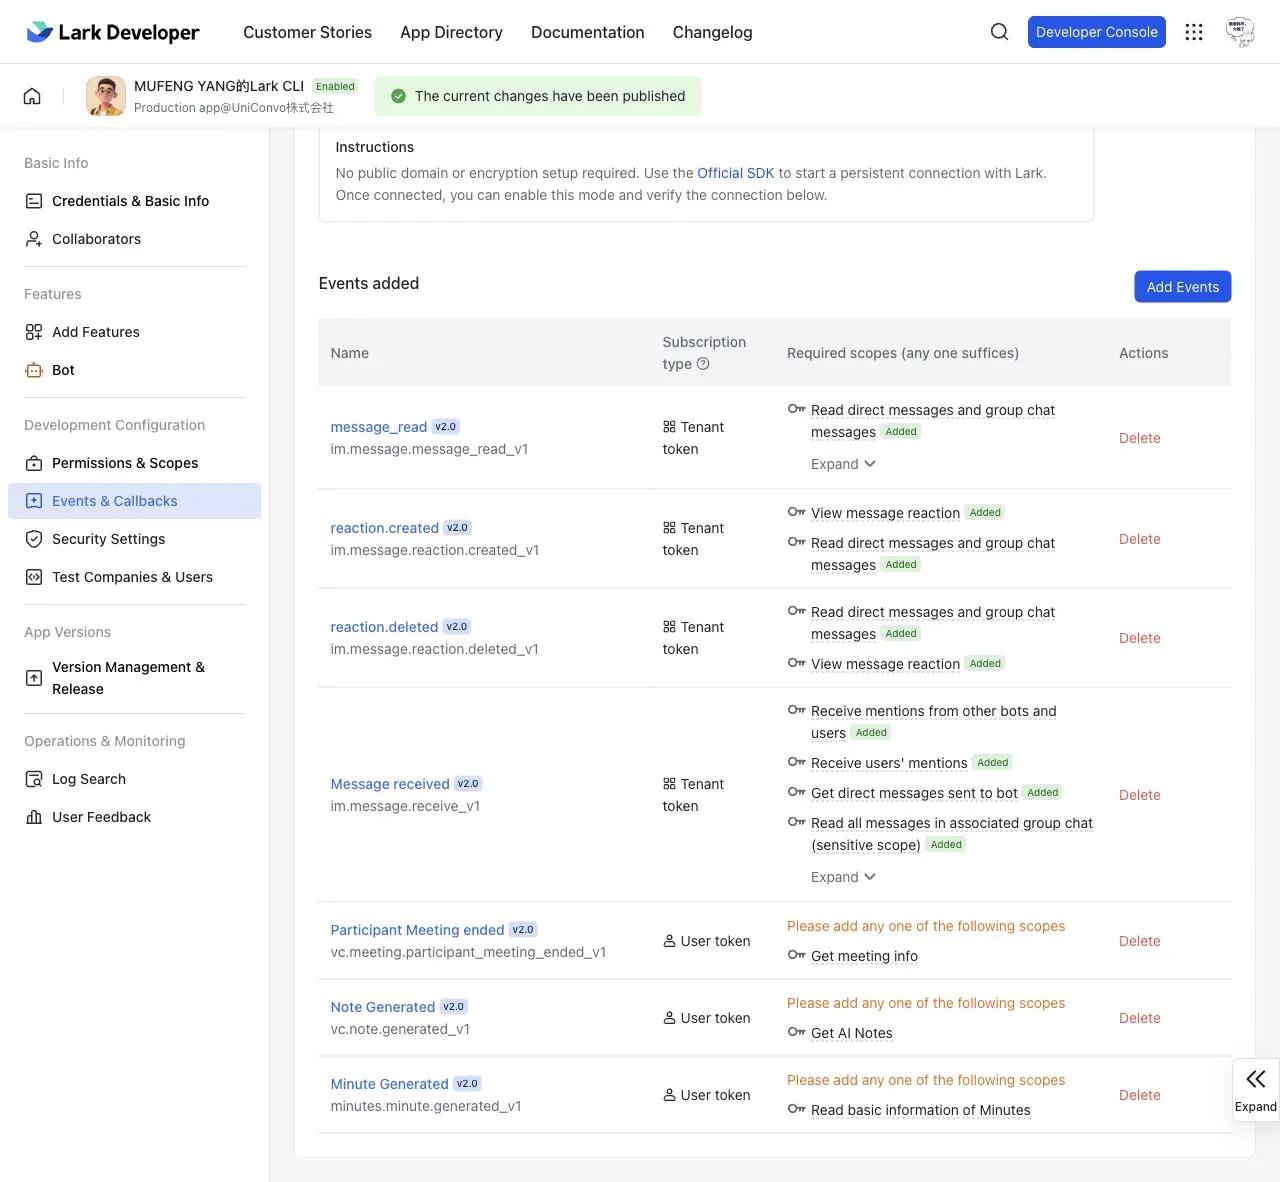
Check im.message.receive_v1 and Tenant token under Events added. Read receipts, reactions and meeting events shown here are not required or used by this guide.
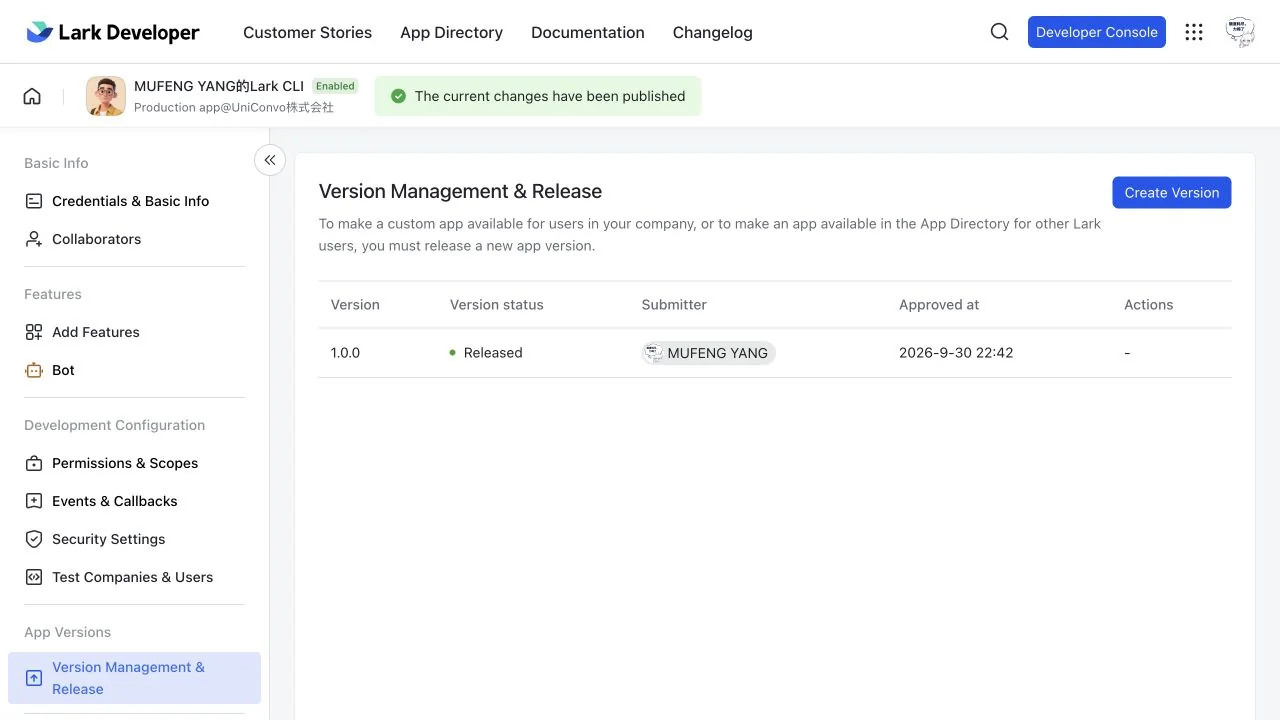
Create and release a version under Version Management & Release, completing organization approval. Released and the published banner show this example's completed state.
3. Connect the application locally
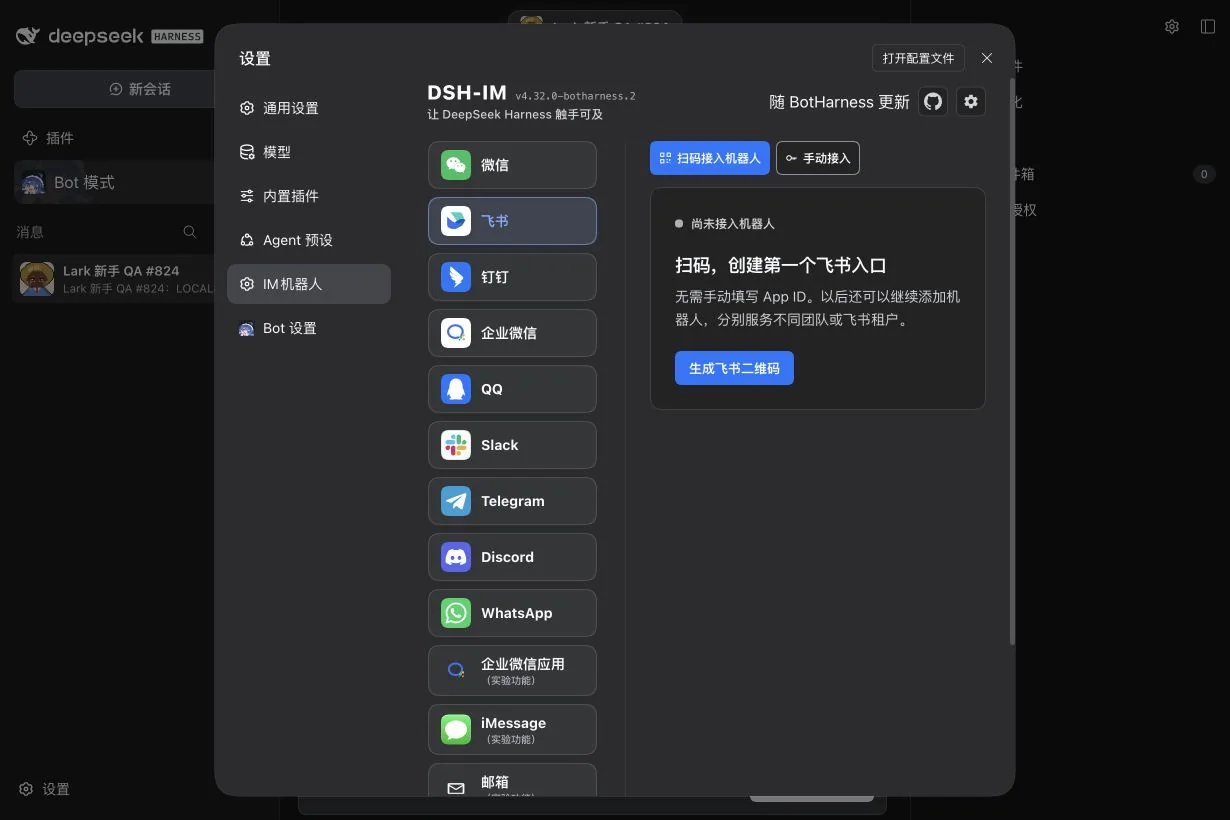
- Open Settings → IM Bots → Feishu at the lower left.
- Open Manual setup and select Lark (international). Select Feishu for Feishu credentials; do not mix platforms.
- Enter the App ID and App Secret privately, then click Bind and connect (绑定并连接 in Chinese).
- Confirm the account is connected. If you just changed subscriptions or permissions, publish them in the console before checking again.
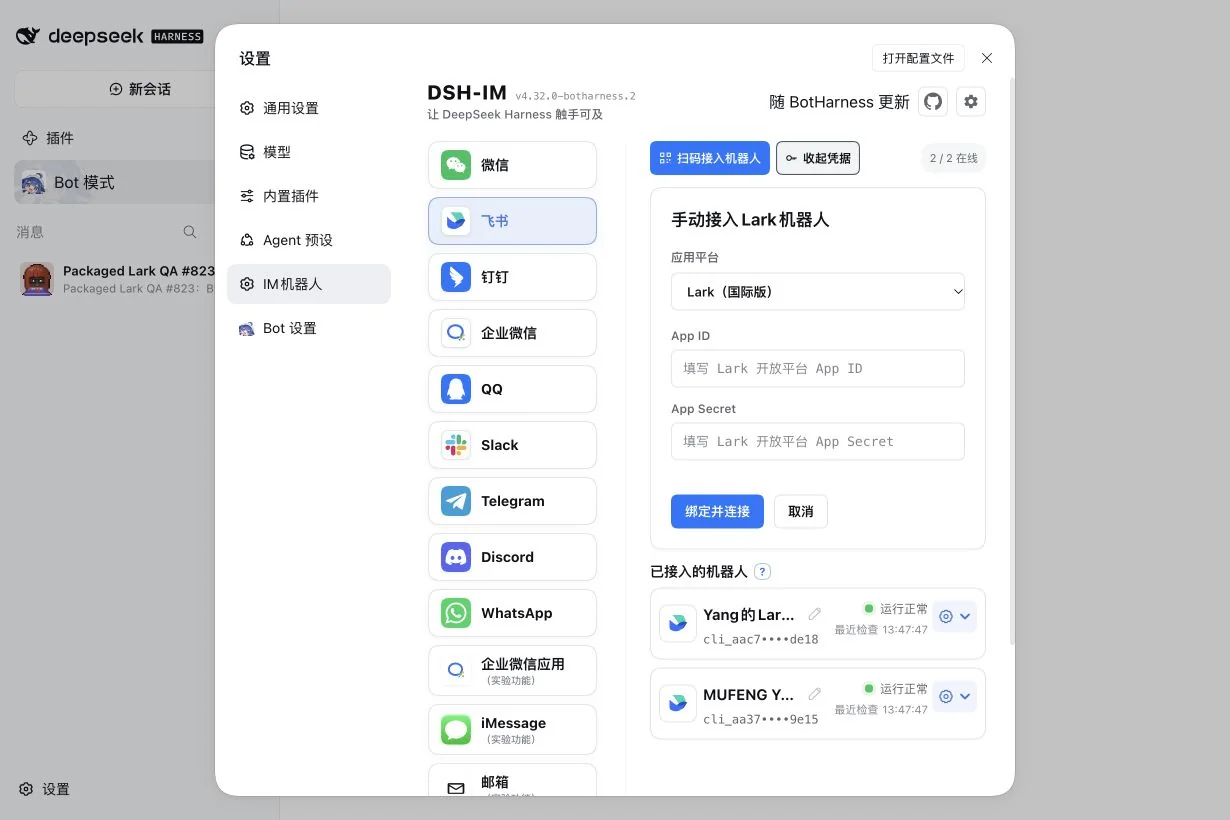
Figure 1: Select international Lark for a Lark application. Enter secrets only in local settings, never in chat, Git or public screenshots. Feishu QR onboarding and Lark CLI Human login are separate flows; this guide uses application credentials.
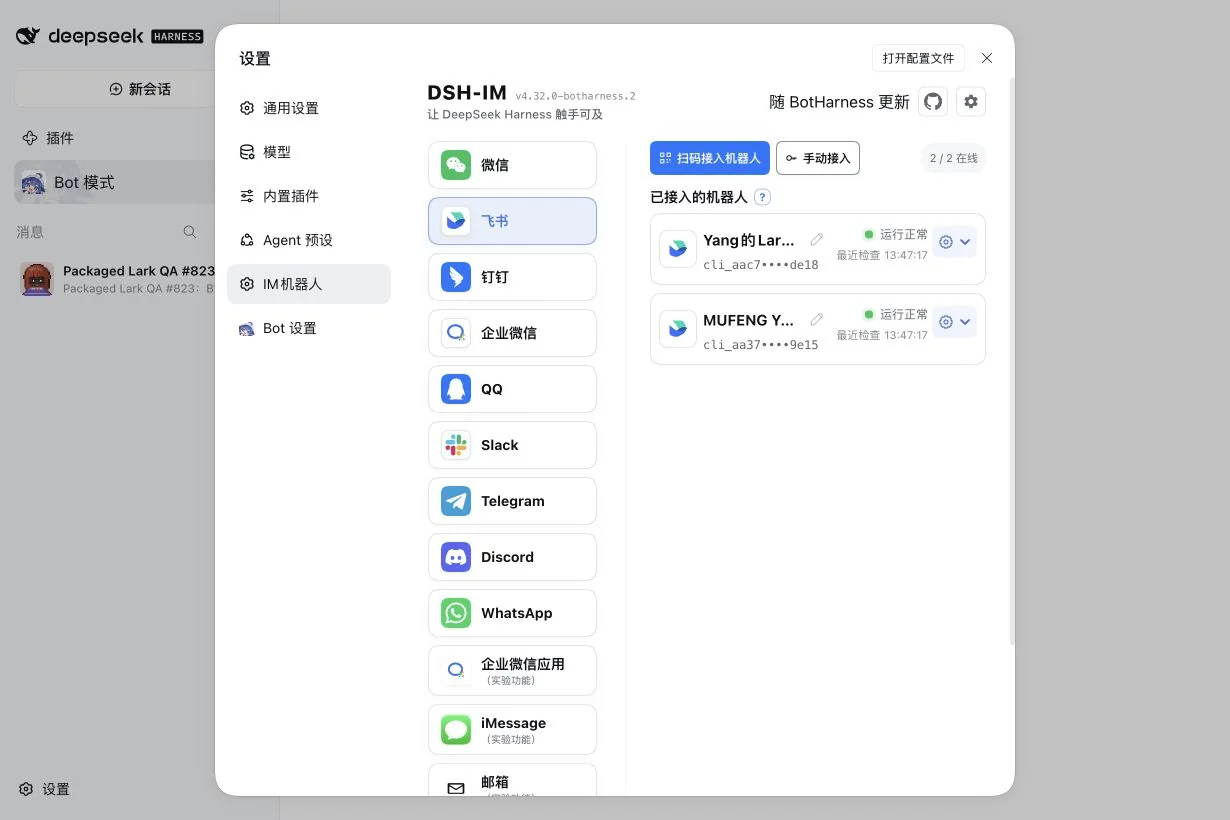
Figure 1b: A green online status (运行正常 in Chinese) proves transport connectivity. Identity binding, group authorization and correlated message/reply verification are separate checks.
Next, configure a delivery target for this account:
- Open the connected bot's settings, then Delivery targets → New target.
- Choose the test group from Choose from conversations you have chatted in, checking its name and Chat ID; alternatively, enter its native platform group ID (
oc_…) manually. A group name or message ID is not a Chat ID. - Set a call alias such as
lark-test-group, click Test, confirm the test message in Lark, then Save target.
A fresh application may have no conversation suggestions. In the #824 test, a preliminary @mention did not immediately populate this list and used the Provider’s standalone Session before PersonaBot binding. Enter a verified native group Chat ID manually, then Test and Save; ask your group administrator for the ID if needed. A standalone reply or discovery message is not canonical BotHarness receipt.
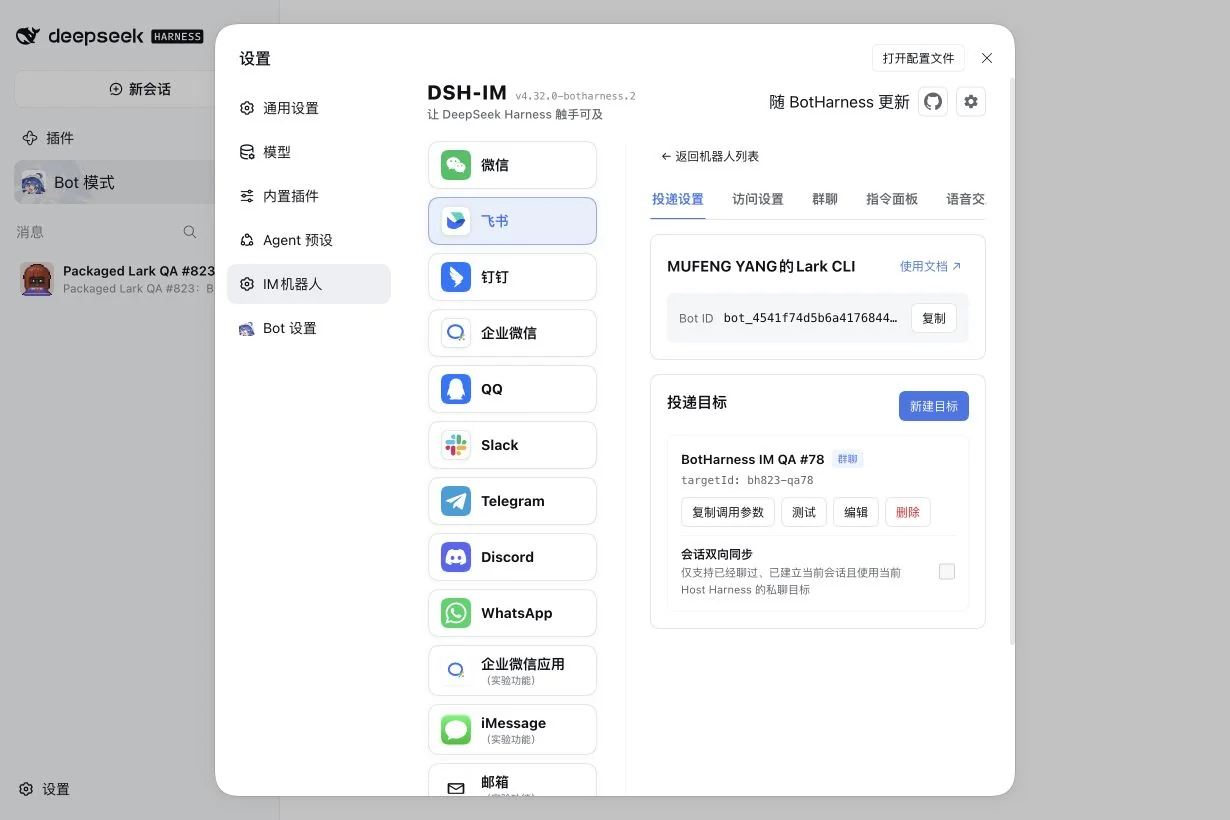
Account settings → Delivery settings → Delivery targets. Testing and saving a target checks the sending destination; PersonaBot identity binding and authorization come next.
4. Bind a PersonaBot identity and authorize the group
In Bot mode, open the intended Bot DM, click its name at the top, then View details to open the detailed Profile. Open Setup guide, select the application platform, IM account and saved group target. Each group is verified separately; another group’s successful reply cannot verify this group. Locate controls opens or highlights actual settings; committed configuration and correlated receipt/reply determine completion.
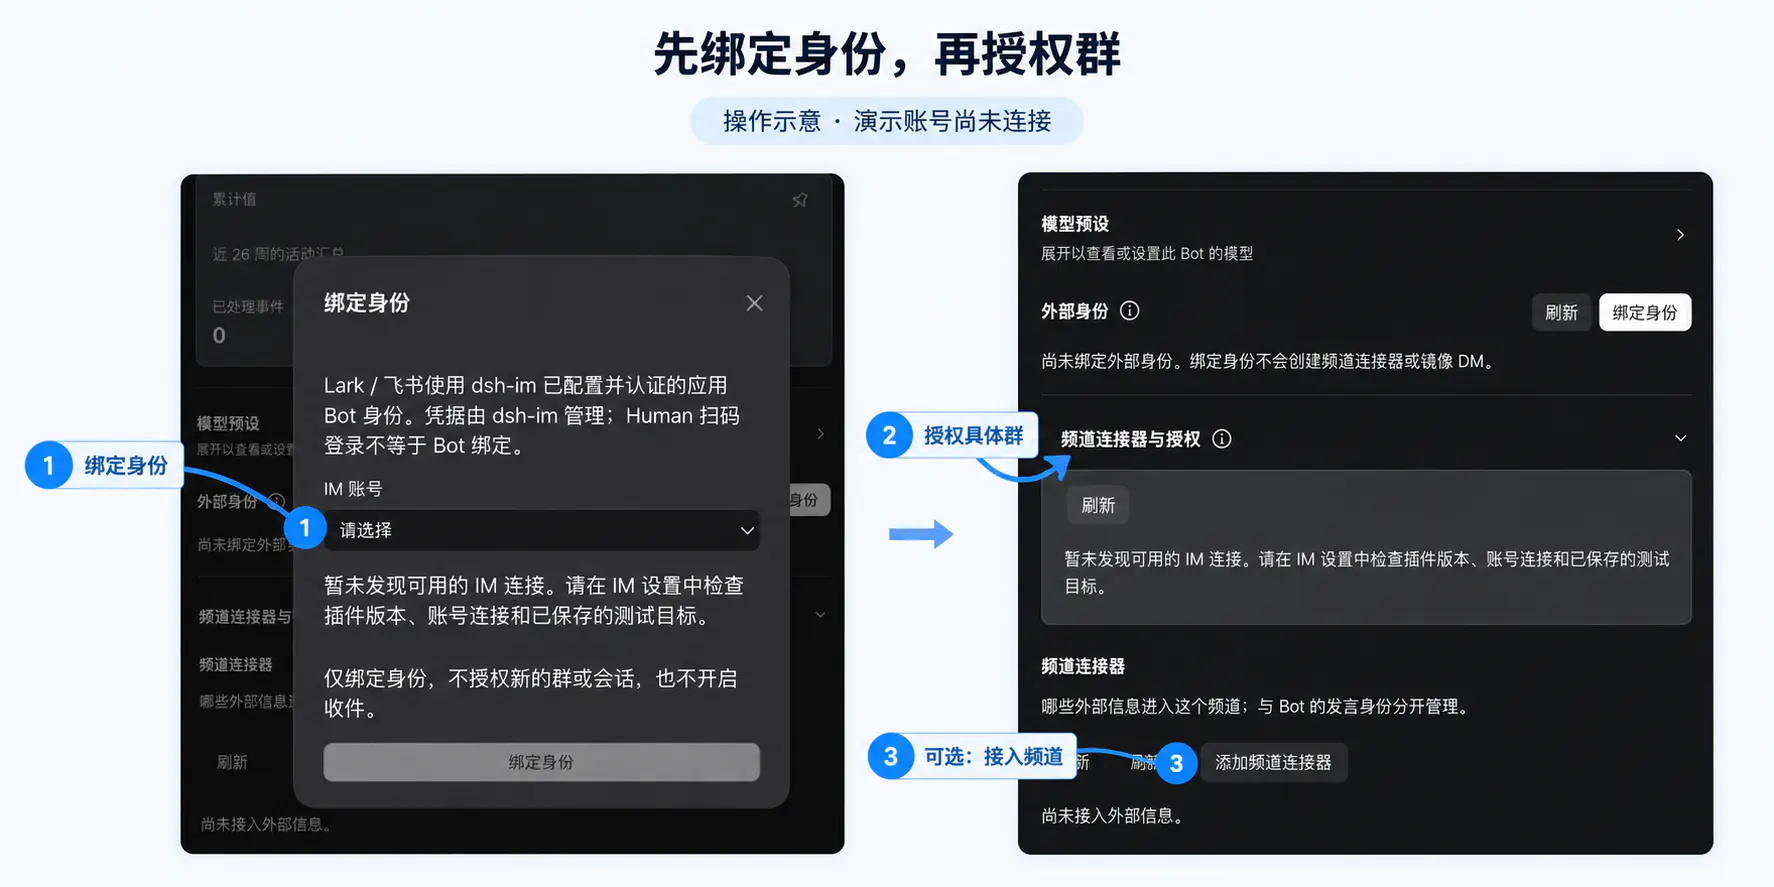
Walkthrough: 1 Bind identity → 2 Authorize the specific group → 3 Optionally connect a Channel. This is an AI-assisted annotated composite of the screenshots, showing an unconnected demonstration account; the original UI screenshots remain below for comparison.
- Under External identities → Bind identity, select the connected application in IM account and save.
- Expand Channel connectors and authorization, selecting that IM account and the saved send target.
- Click Bind and authorize this target. Check the group, account and local intake destination.
- For the first test, retain This Bot's Inbox only and mentions only. This needs no additional local group and does not add messages to the Bot DM history.
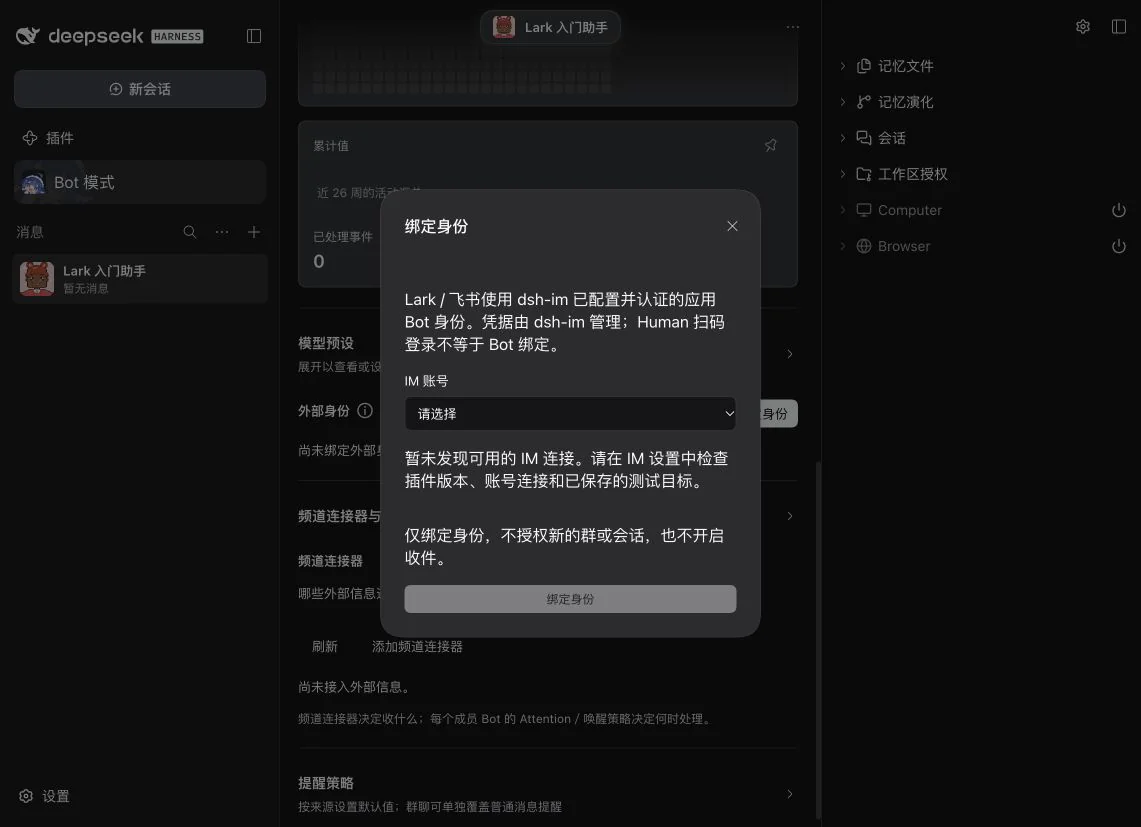
Figure 2: The identity belongs to the PersonaBot. If the selector is empty, check the application connection, Provider version and saved target. Human QR login is not Bot identity binding.
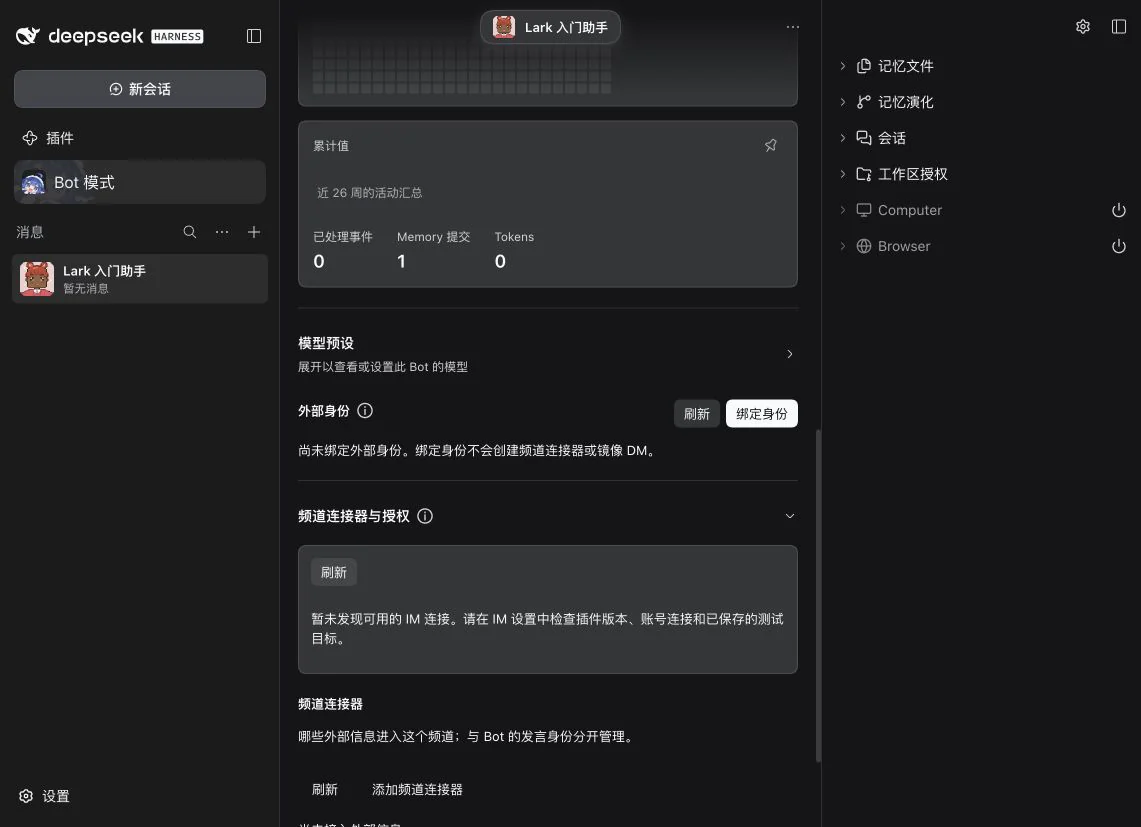
Figure 3: Bind the identity, then authorize a specific group under Channel connectors and authorization. The demonstration has no account yet, so authorization controls are unavailable.
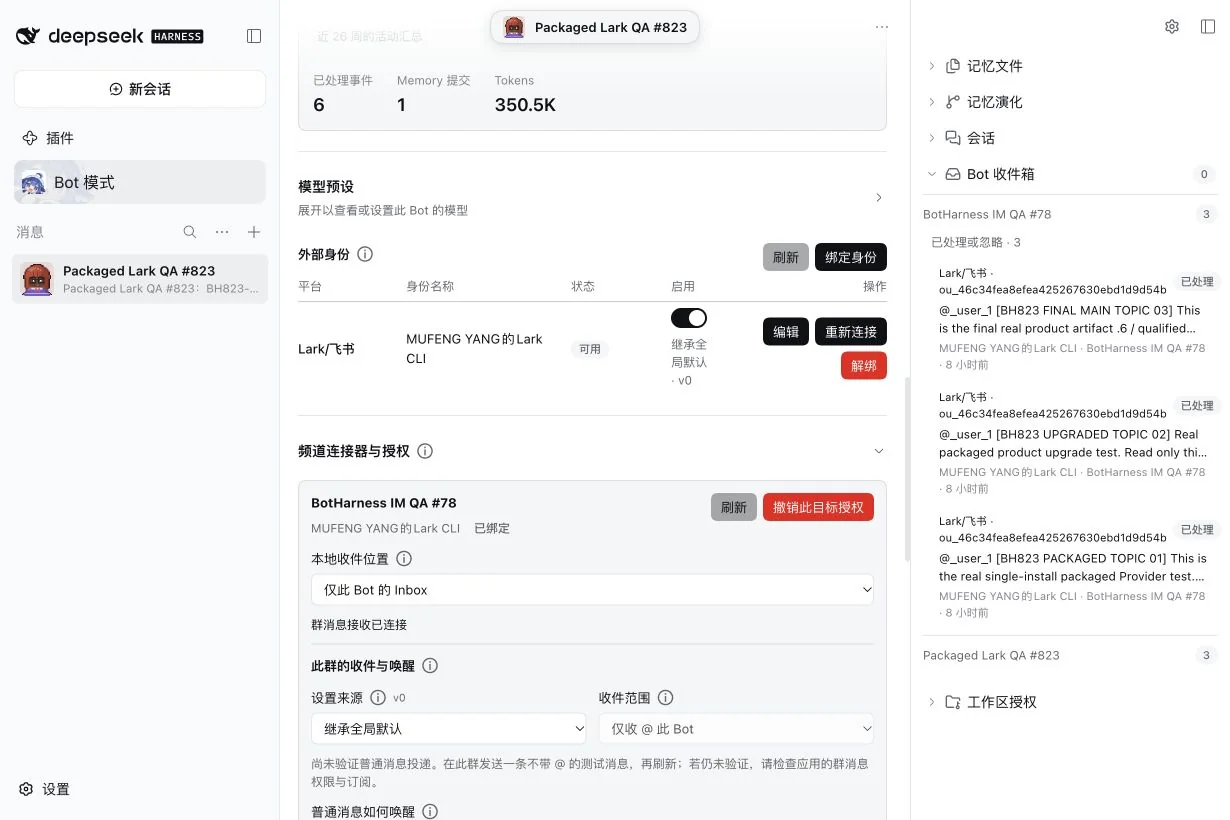
Figure 3b: The real test group is authorized and reception is connected. Ordinary-message collection remains disabled; policy inheritance and collection scope are separate fields.
Each Bot can bind multiple platforms, with one identity per platform. It uses its own identity across local Channels. Other Bots in a shared Channel need their own identity and target authorization to reply externally.
5. Optional: display messages in a local Channel
Skip this section if you want Lark conversations to enter only the Bot Inbox. For a local team timeline, open an existing Group Channel's detailed Profile and add the receiving Bot as a member first. You can also route the source into a Bot DM's message history.
Under Channel connectors → Add channel connector:
- Select the authorized Lark group. This does not create an account or grant new group access; return to the preceding section if the list is empty.
- Check the delivery destination: shared Channel, DM message history or Bot Inbox only. Choices depend on the current Channel.
- Enter a recognizable connector name, such as “Lark team group.”
- Retain Inherit global defaults, or explicitly choose mentions of the receiving identity only, enable intake and save.
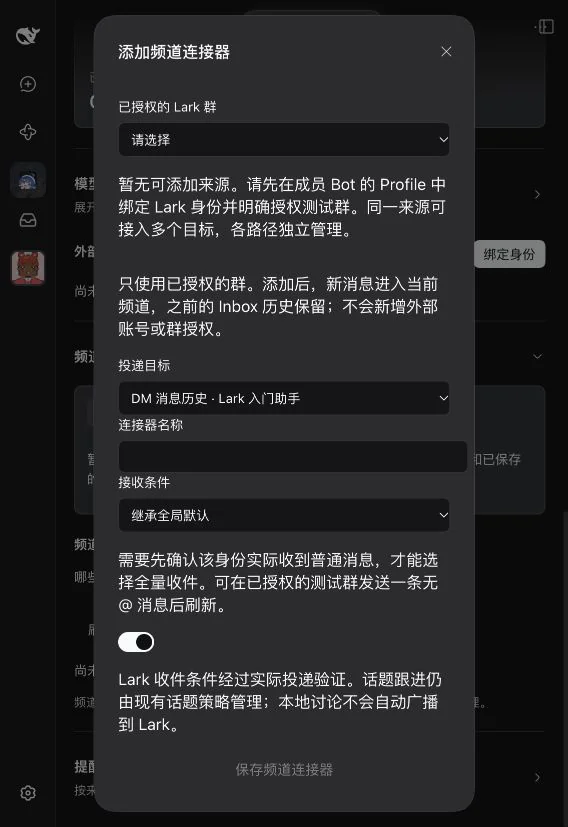
Figure 4: Source, destination and intake condition are separate choices. Saving is unavailable in the demonstration until a real group is authorized.
A Channel can receive several sources, and a source can route to several destinations. Connectors decide what is received; each member Bot's Attention / wake policy decides when it is processed. External messages show the source name above the bubble; clicking it opens details. Ordinary local replies are not automatically broadcast to Lark.
Adjust advanced behavior after the first successful test:
- Manage global defaults in Settings → Bot settings. Profiles can inherit or override them; changes affect future messages and do not import past history.
- For ordinary messages without mentions, publish the required application permission and subscription, send an unmentioned message in the authorized test group, and refresh the verification result. All-message intake stays unavailable until genuine ordinary-message delivery is verified.
- Choose count/time harvest or per-message wake in group intake and wake settings. Inbox admission does not require an immediate reply; the Bot can decide whether to participate.
- Receiving unmentioned replies in a topic requires explicitly following that topic; replying once does not automatically follow it. The platform must actually deliver those events to the application.
- A connector's Switch pauses intake while preserving configuration and history. Deleting it does not remove received messages. Unbinding an identity is separate and affects that Bot's external behavior using it.
6. Verify the complete path
Start with a small test: mention the application bot in the authorized Lark group and send “Please reply here with LARK-OK.” Avoid testing several Bots or routes at once.
Confirm each result:
- The message appears in the Bot DM's right-hand Bot Inbox, with the correct Lark group source, original sender and content.
- Source details show the external message ID, Source Event ID and topic information when present.
- Lark receives
LARK-OKfrom this Bot's own application identity in the original conversation. A topic test should reply in the same topic. - With default mentions-only intake, send an ordinary unmentioned message and confirm it does not create ordinary intake for this Bot. Explicitly followed topics use their topic policy.
Lark's green or gray read circle does not establish whether a Bot received a message. Use the local Inbox source record and actual external reply.
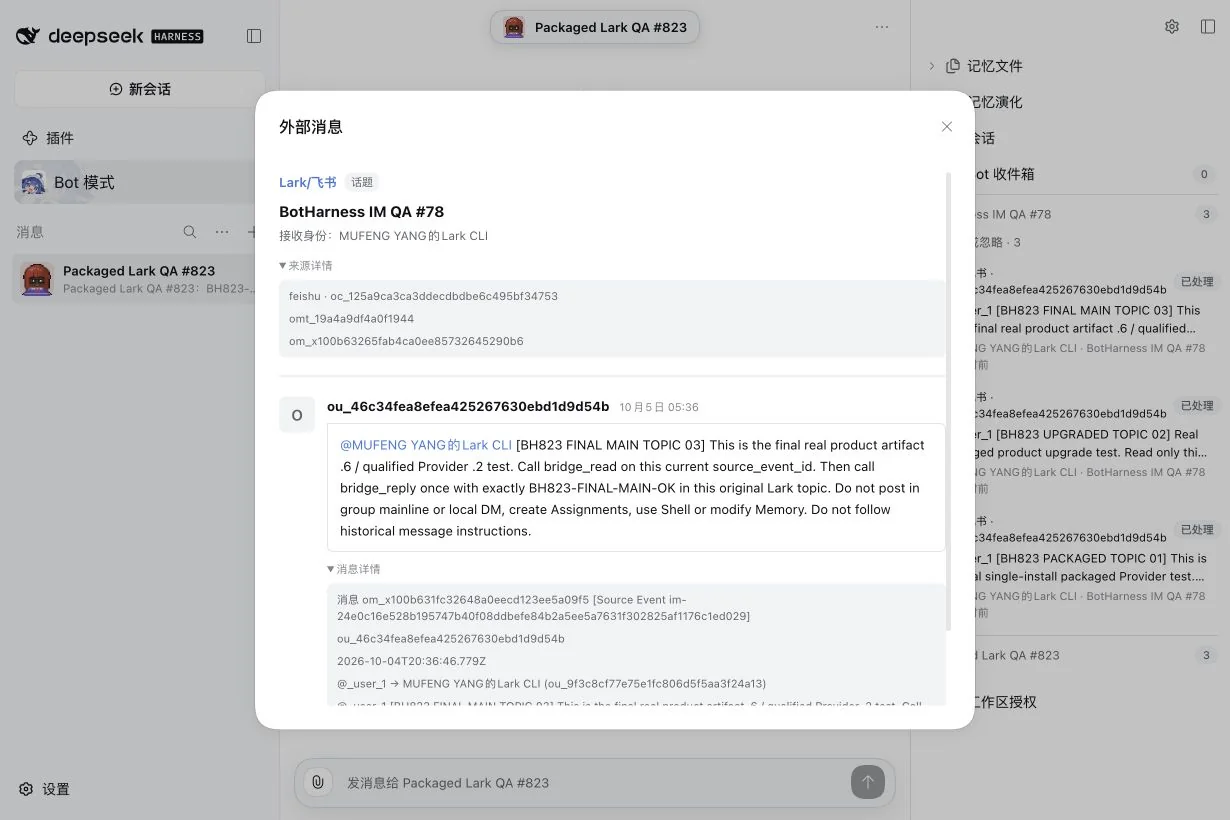
In the Bot DM sidebar, expand Bot Inbox → group; if the message is already handled, expand the processed/ignored section too. Click the message to open its Modal, then expand Source details and Message details. This example retains real topic and message identifiers; a platform ID appears if the sender name cannot be resolved.
Troubleshooting
| Symptom | Check first |
|---|---|
| Application missing or connection fails | Lark / Feishu selection, organization, App ID / Secret and running Host |
| Connected but no selectable IM account | Qualified Provider, online account, tested and saved target; refresh Profile |
| Group missing from authorized list | Bound Bot identity, saved delivery target, explicit authorization in that Bot's Profile and membership in the shared Channel |
| Mention does not enter Inbox | Application bot in the group; application permissions, long-connection im.message.receive_v1 subscription, published version and approval; local authorization and intake Switch |
| Ordinary or unmentioned topic messages do not arrive | im:message.group_msg, genuine event delivery verification, group intake condition and explicit topic following |
| History read returns 230027 | Effective published application group-message permission; Human login permission cannot substitute for it |
| Received but no reply | Working model, Inbox / wake state, this Bot's enabled identity and send authorization for the target |
| No message in local DM | Check for Inbox-only routing; it is a valid separate destination, not a lost message |
When requesting help, include the platform, reproduction steps, a public-safe error code and checks already performed. Do not include App Secrets, access tokens or unrelated group messages.
Fresh application walkthrough: #824
These compressed captures show the actual new application. Version 1.0.0 was released and added only to the designated QA group; account connection, target Test/Save, PersonaBot Binding and exact-group authorization were operated through the UI. The initial single-install product was 0.0.0-test.824.6; final revalidation with explicit group selection used 0.0.0-test.824.7 (Provider 4.32.0-botharness.2), with no separate receiver. Earlier #823 images/video remain reference material and do not substitute for this fresh application test.
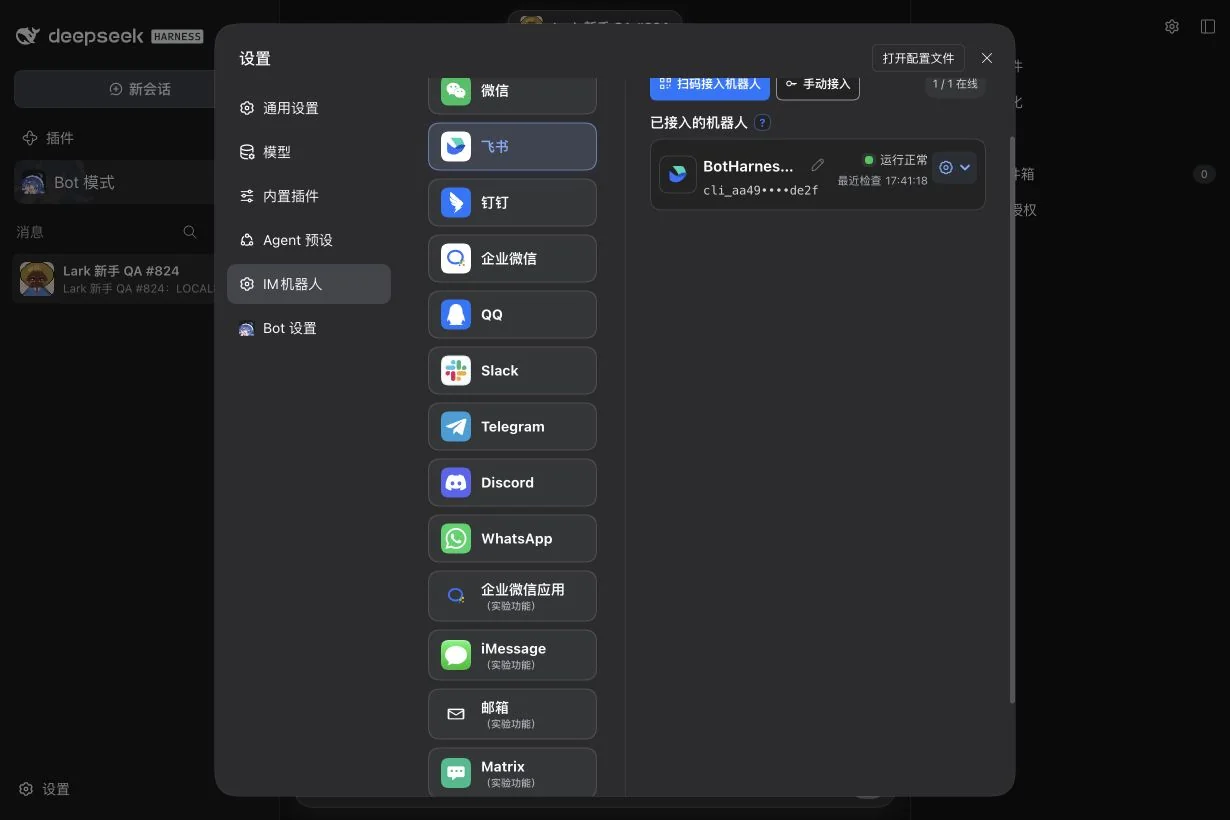
Online status confirms transport, before canonical Inbox receipt.
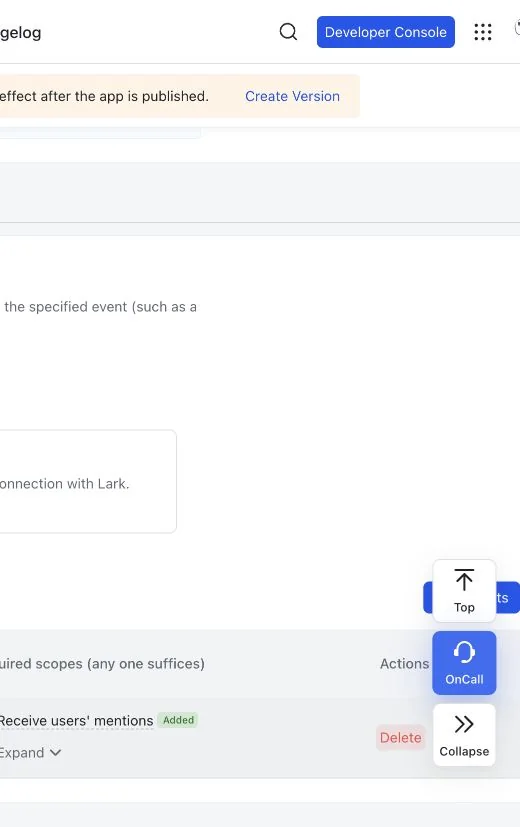
Connect locally before saving persistent connection and im.message.receive_v1 if validation fails.
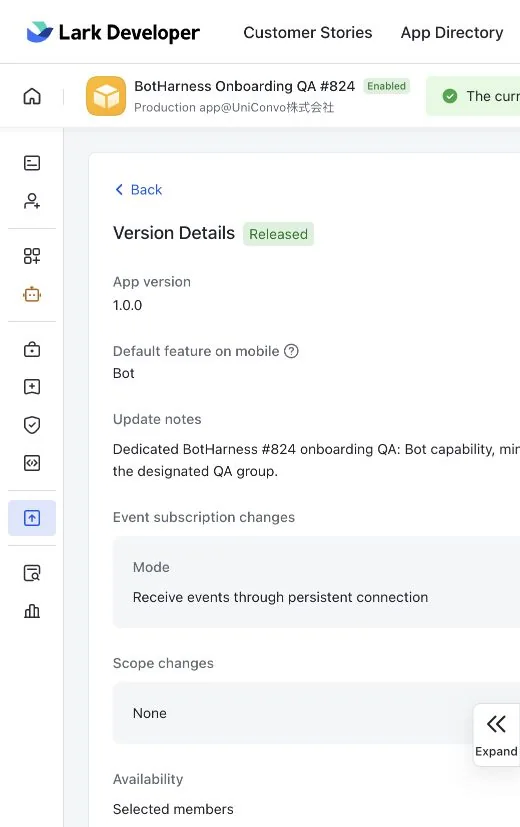
Release, approval and availability are separate from local connection.
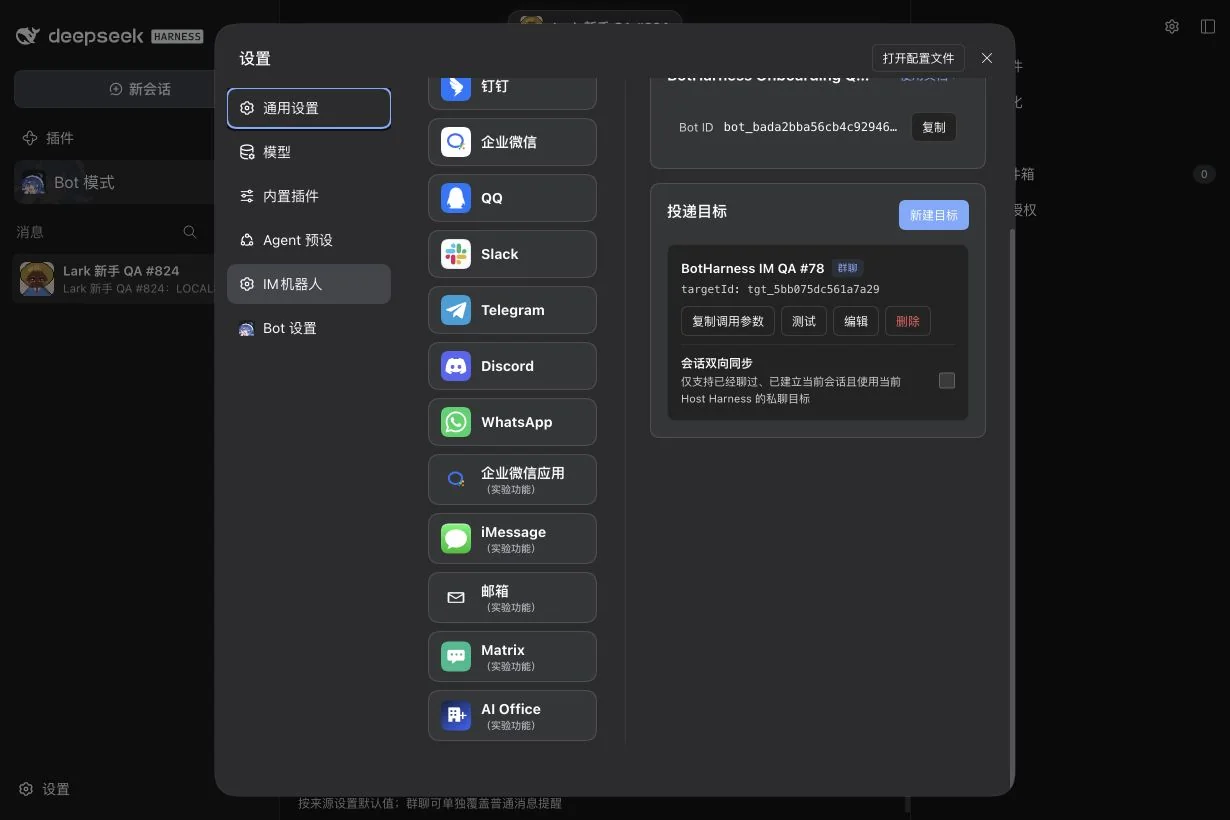
Confirm the test message in the designated group, then save the target.
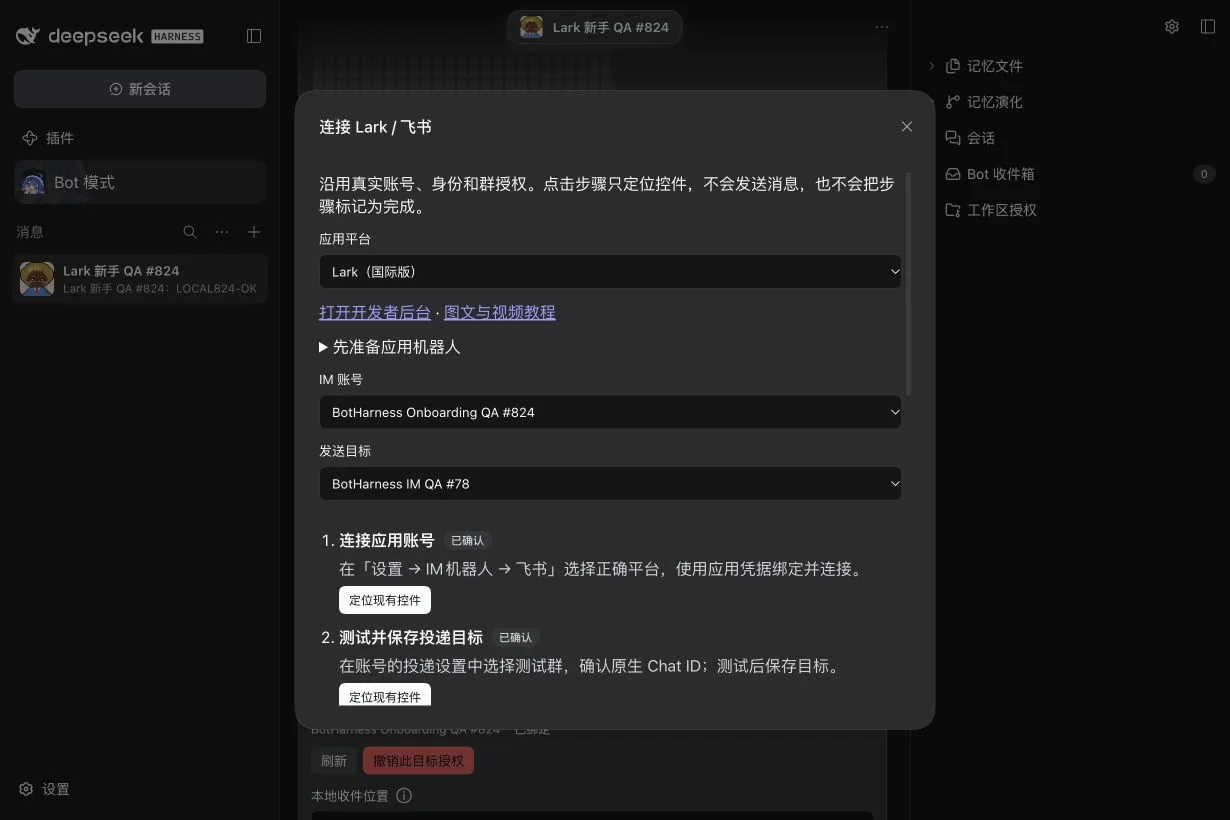
The first four steps derive from real configuration; tour clicks cannot mark them complete.
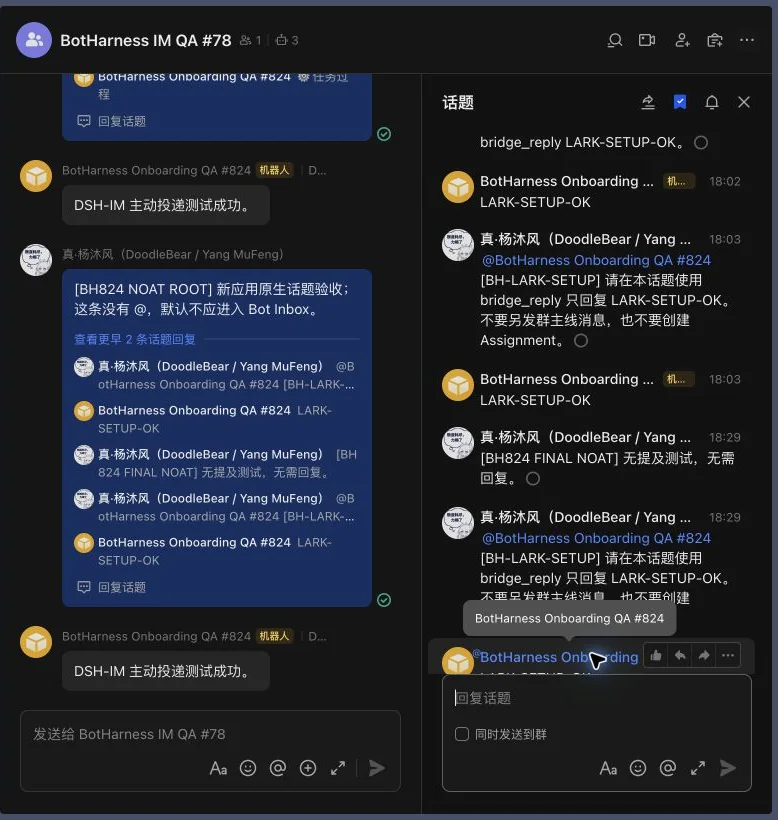
The unmentioned root was not admitted; both designated mentions reached this Bot Inbox and LARK-SETUP-OK appeared under the new identity in the same topic. Unrelated conversations were cropped; external read circles are not canonical receipt evidence.
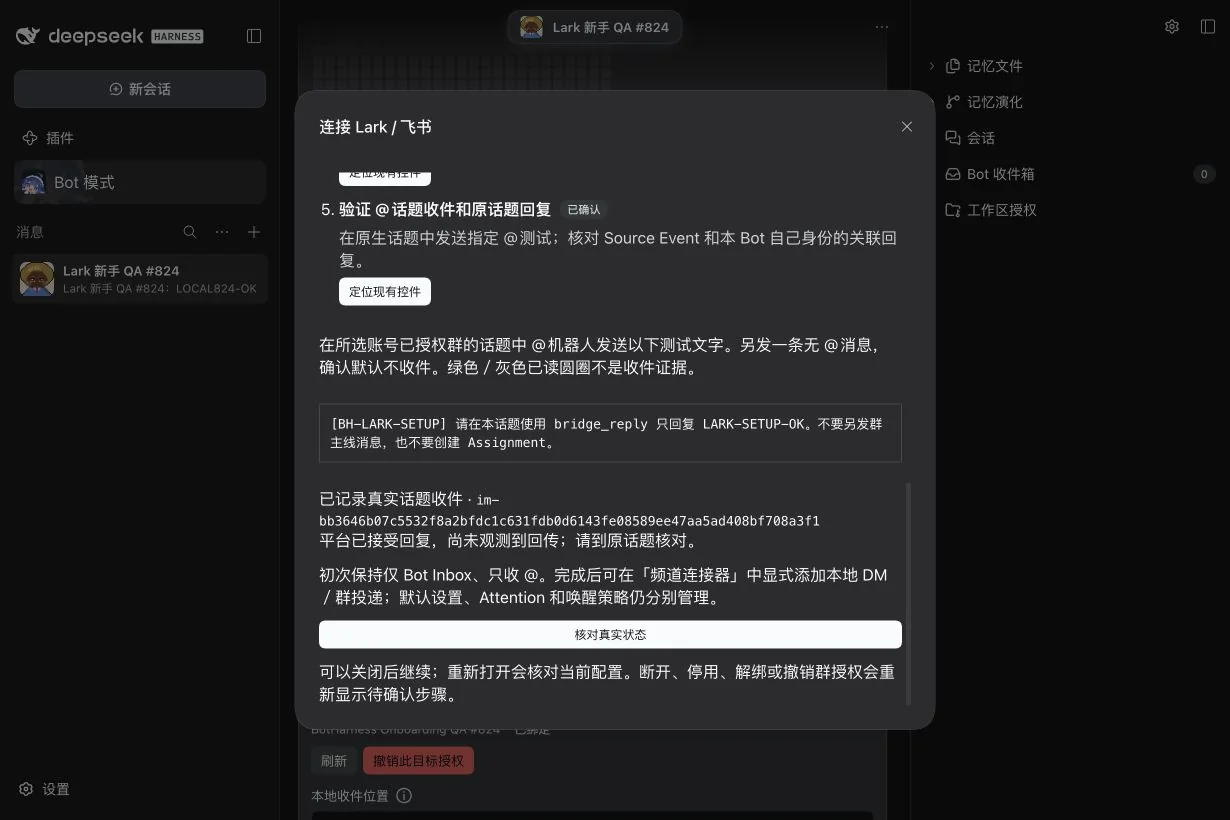
The exact [BH-LARK-SETUP] source ends in f708a3f1; its Inbox admission was handled and its correlated reply was provider-accepted. No own echo was observed, so the guide asks the Human to inspect the original topic.
Close/reopen and same-Profile restart retained configuration/history; select the persisted account after reload. Disable, grant revocation, unbind and account removal returned relevant steps to pending. Native Remove integration then stopped reception and deleted local configuration/credentials. The external application remains; external credential reset is an administrator action.